
When I’m not working for the Silver Century Foundation, I help families with care management solutions. Most often, this involves meeting with an older person and a family member to coordinate resources that help my client continue to live independently.
One of the first tasks is organizing important contact numbers and documents. Over the years, I’ve created a process that I believe could help you, or someone in your care, do the same. I’d like to share my process with you, starting with how to deal with emergency contact information. (I’ll cover other areas of need in future blogs.)
Are you familiar with the acronym ICE? It stands for In Case of Emergency and provides critical, personal information in situations where you can’t speak for yourself. Most first responders—police, firefighters and EMTs—are trained to look for an ICE card in your wallet, in the glove compartment of your car or on the refrigerator. Using one of the many links available online, you can easily make ICE cards for yourself and give them to every member of your family. I also made cards for my daughters with their own information, to keep in the glove compartments of the cars they drove.
This is a case where “old school” is better, so I suggest keeping a paper list of your emergency contacts. It’s a good idea to have ICE contacts designated on your cell phone as well. PC Magazine offers a helpful article that shows you how to add ICE numbers to a cell, so they can be accessed even if the phone is locked. Some phones are easier than others.
Who should be an ICE contact? Two or three people will suffice, usually someone who lives nearby and a family member or two. I have my daughters as mine, along with a local friend who knows how to reach family, has a key to my home and would let the dog out if necessary.
Choose people who would recognize a fraudulent call if they received one and who know what you would need to have done in an emergency. When you pick your ICE contacts, don’t forget to tell them—make sure they are comfortable with the role and won’t be surprised in an emergency. I also have my primary care physician’s name and phone number on my card. There’s room to note allergies and organ donor wishes.
In my cell phone contacts, I add the letters ICE to the person’s information under Company Name (your cell phone may have a different category title). That way, if someone wants to search for my emergency contacts, those names come up together.
After getting ICE all set up, I organize the client’s emergency health information. The key here is to always keep it current. I suggest to my clients that they carry a list of prescription medications and dosages in their wallets (and that they update it when any changes occur).
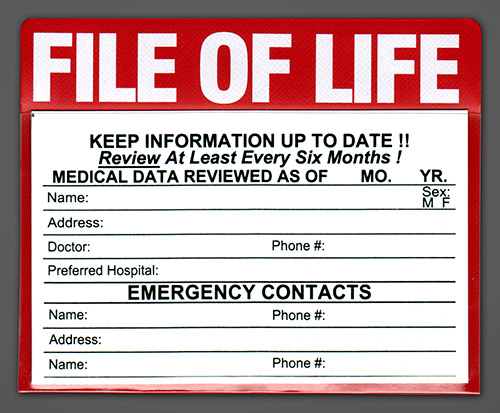
On the refrigerator, I hang a File of Life, a magnetized pouch that holds the following information: street address and cross street (for calling an ambulance); home phone; date of birth; names of doctors; lists of medications and allergies; and, of course, ICE contacts. If there is more information you feel a first responder should know, put it in the file. For instance, when my husband was living, I identified him as a person with a pacemaker. I have my veterinarian’s number in the pouch as well.
Something to consider: adding your homeowner’s insurance contact information to your list could be very helpful in case of an evacuation, along with proof of pets’ vaccinations to get you into a shelter with Fido.
Check with your local government or first responders to see if they can provide an official File of Life. If not, you can label a large ziplock bag as such, fill it with your documents and hang that on your refrigerator.
Congratulations, you’ve begun your emergency preparedness plan and hopefully gained some peace of mind. Coming soon, part 2: organizing a master file of important documents.
Pepper Evans works as an independent-living consultant, helping older adults age in place. She is the empty-nest mother of two adult daughters and has extensive personal and professional experience as a caregiver. She has worked as a researcher and editor for authors and filmmakers. She also puts her time and resources to use in the nonprofit sector and serves on the Board of Education in Lawrence Township, NJ.